Pages

Showing posts with label TSS. Show all posts

Sunday, 3 October 2010

Yellow Cactus Dahlia Canvas

Sorry I've been so quiet.  I'm having quite a hard time at the moment due to nueropathic pain caused by my MS.  I've got an appointment on 20th October at the Pain Clinic to see if they can help.

Anyhoo enough of my woes.

Last week a family friend, Keith, who has an allotment near my parents left a plant pot full of dahlias in their back yard.  He gives us some every year after the Leek Shows, after I told him a few years ago how much I love them.  You can see from the photo how wonderful they are!


A couple of years ago, Keith was doing some work in my house and I had some Stambord blocks that I had not long finished on the hearth.  He was fascinated by them and the rest of my artwork.  I offered to make something for him and he asked if it could be based on a yellow cactus dahlia he grown some years previously.  He gave me a tattered photo taken before digital cameras with the dahlia in the distance.  This is a close up of the yellow cactus dahlia he gave me this year (complete with greenfly!).

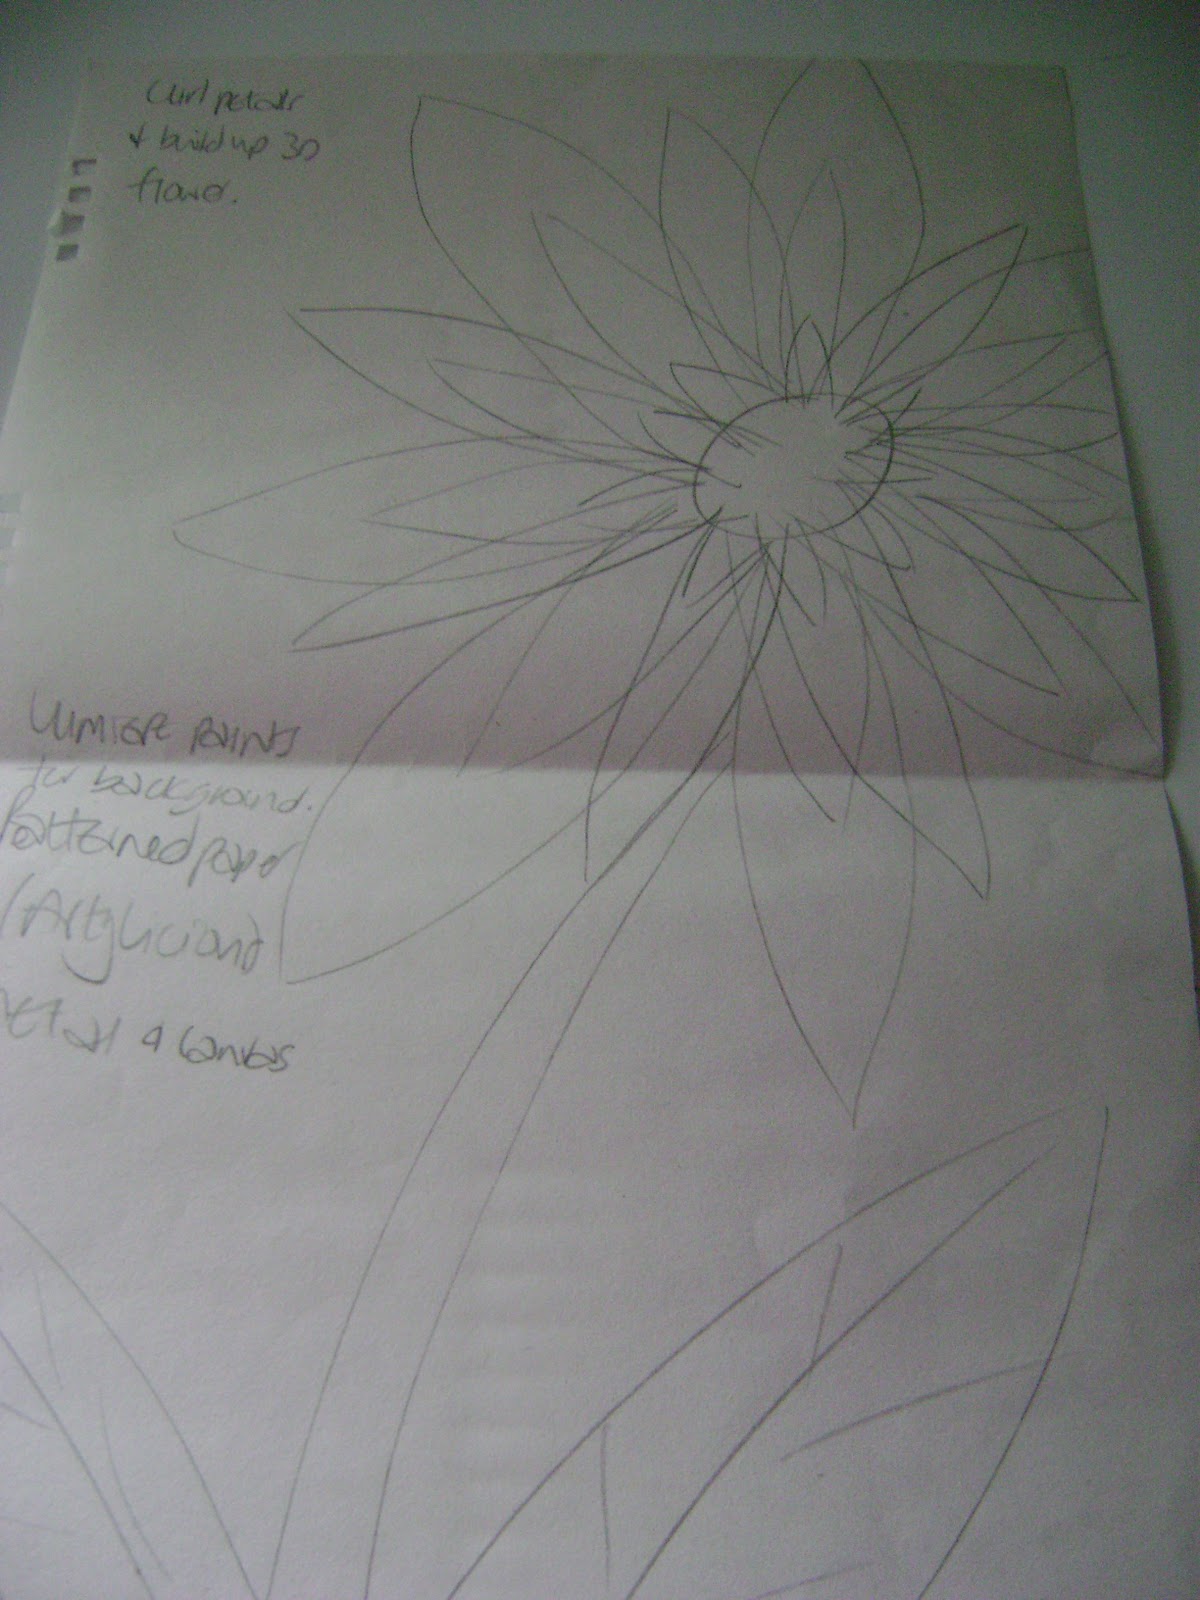
I first drew out what I was thinking and added some ideas for materials.  It still shocks me at how good the drawing turned out, as I couldn't really see the dahlia in the photo, so I drew this image from memory.

I knew I wanted the flower to be 3D, so working out how to do it became a real challenge.

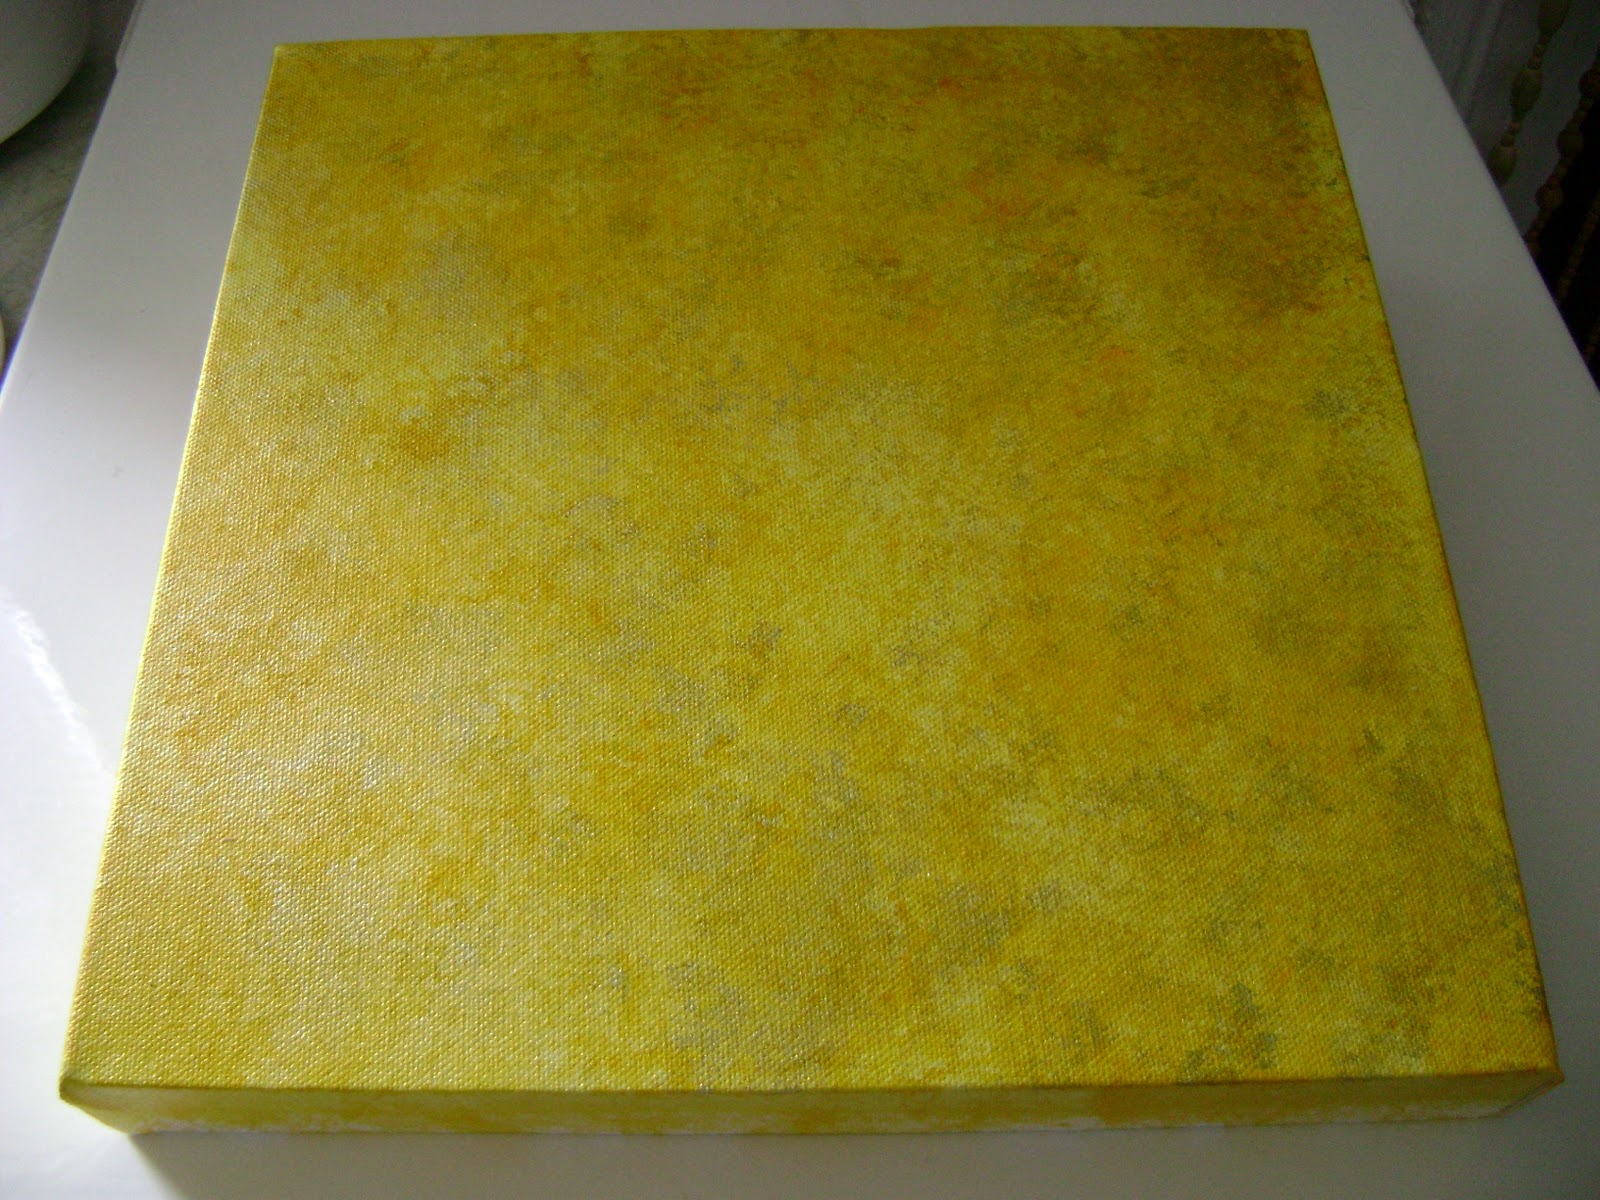
I decided it would be best shown on a canvas, so I coloured a 12x12 deep edge canvas with various yellow and green paint.  It was so long ago I can't remember what colours or even paint I used, but I know I used a scrunched-up piece of copier paper to add green to the mix.  I didn't want the colour of the canvas to be the main focal point.

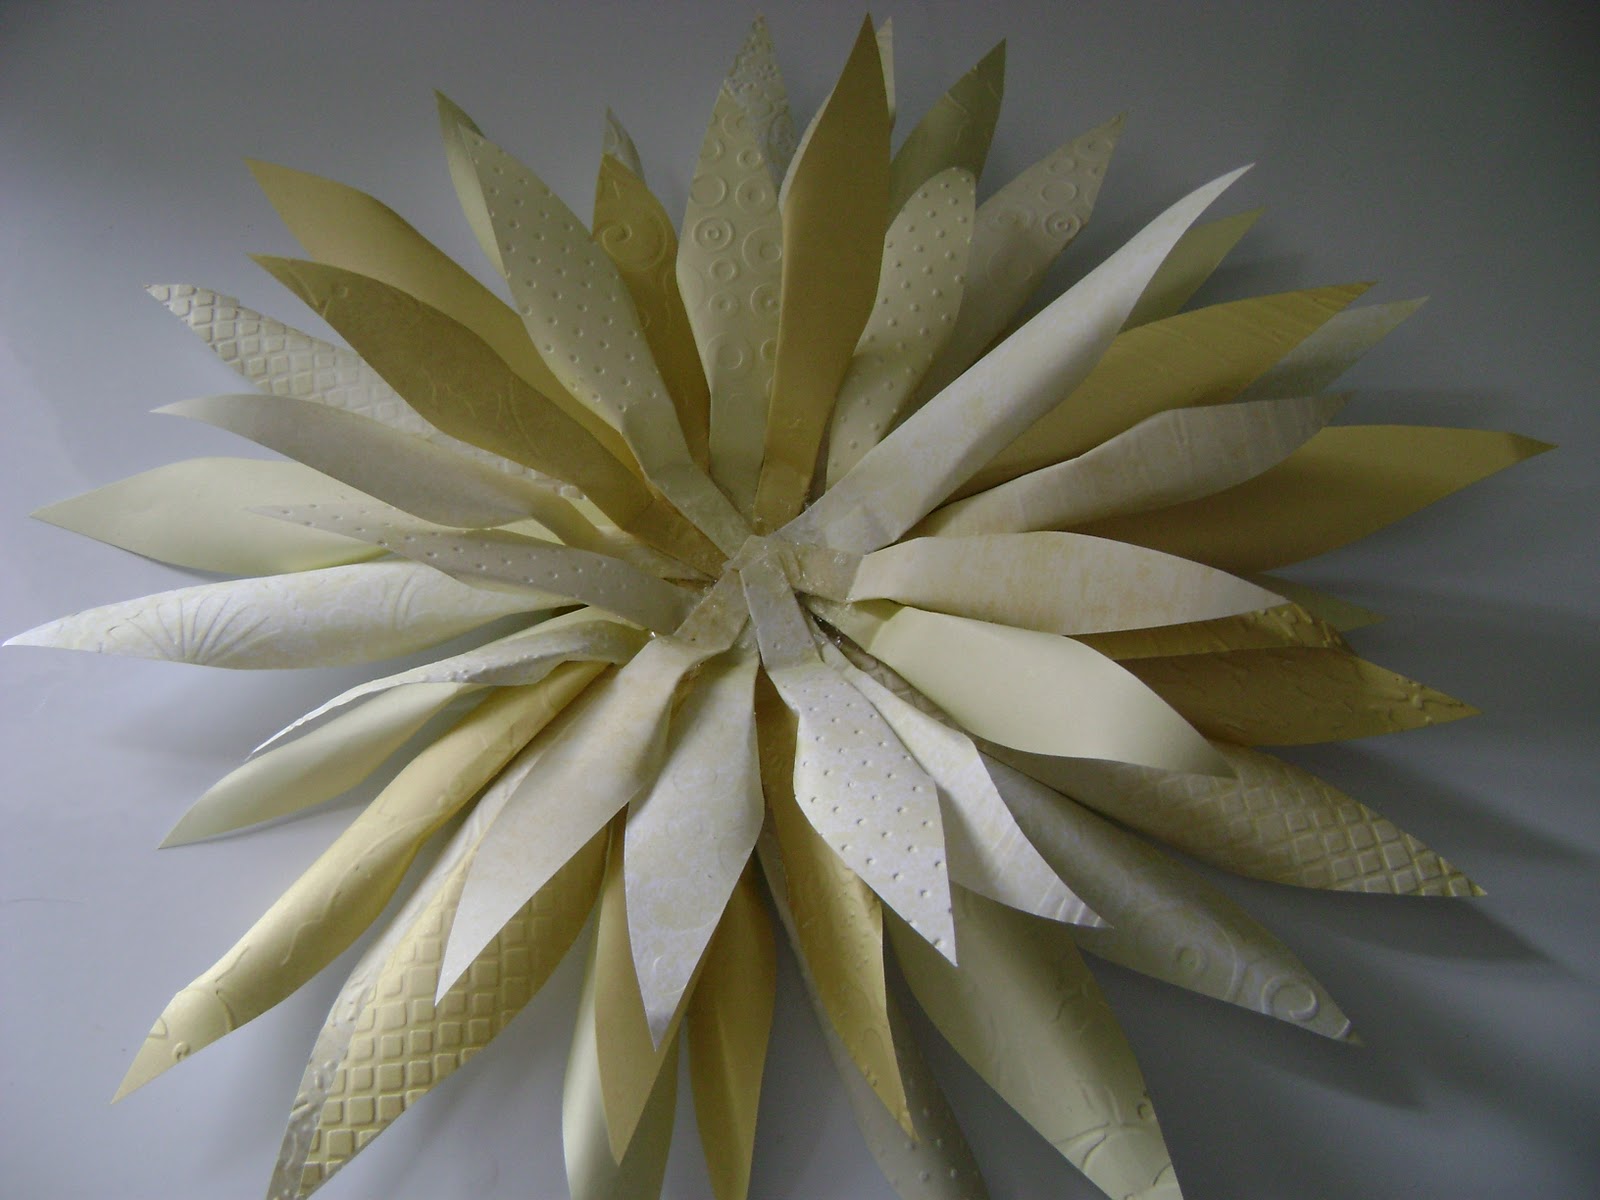
Next I hand drew some simple petal shapes onto acetate and cut the centre portion out so that I could just draw round the inside of the template to make each petal.  These are for the larger petals and I did a similar one for the smaller petals too.

I sat one night in front of the TV drawing petals onto various patterned yellow scrapbook paper.  Then the marathon cutting out started which took a while as I found it so tiring.  I knew it was going to take a lot of petals but I didn't realised just how many!
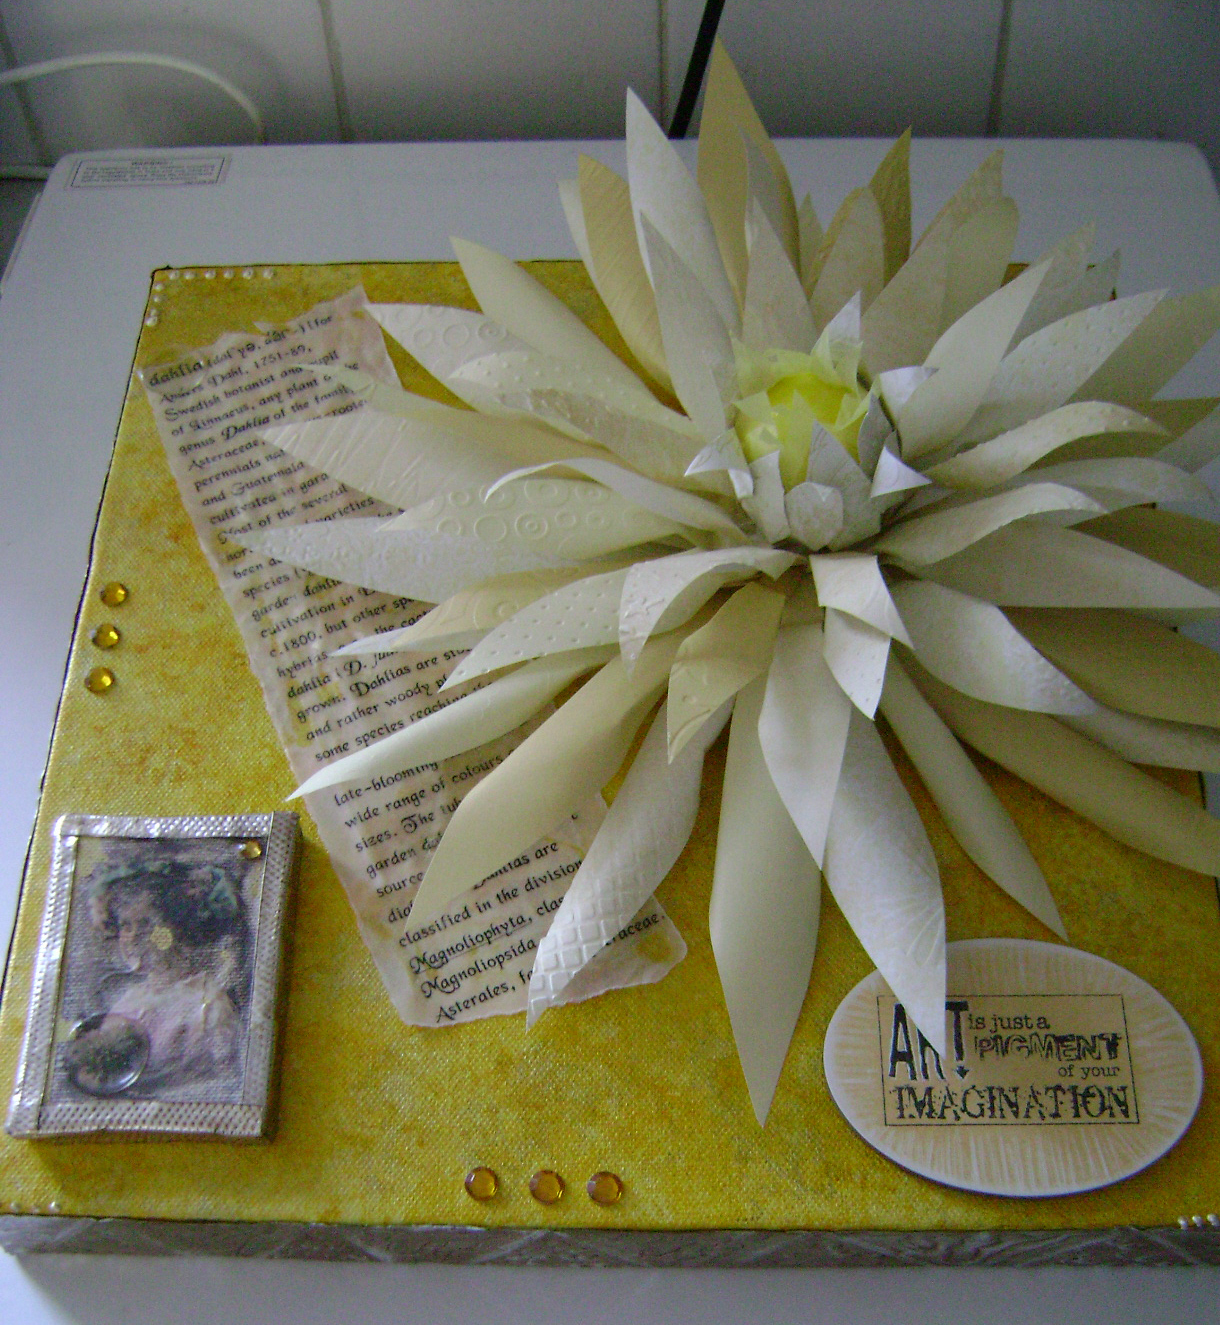
Once I cut the petals I went onto the internet to find a close up of the flower to see how the centre looked.  Its very tight with lots of smaller petals opening from it.  After a few days of thinking I came up with the idea of using a polystyrene ping-pong sized ball and painted it yellow.  I used yellow tissue paper to make the petals for the very centre as it gave the illusion of them just having opened.  While I was on the internet I got a definition of dahlia, copied into Word, changed the font and printed it onto vellum to use on the project. 
 
I wanted each petal to have texture so I put most of them through the Cuttlebug, using various folders with some embossed and some debossed.  I then folded the base of the petals behind and secured with tape.  This meant that they looked more like the real thing.  Once I'd finshed all of the petals I started to build the flower.  I built it off the canvas in case it didn't turn out the way I had envisaged.  I used a 2" square of card as the base and stuck the petals to it using silicone glue.  This photo is of the first two layers of petals.  This was when I realised I needed some more so another marathon tracing, cutting and taping session ensued LOL!!!
 
I built the centre layers of the flower separately too in case of error as the base layers were working so well.  I used a plastic cup to keep the centre upright as the ball just kept trying to roll away!!  I first attached the tissue paper but just stuck to the underside of the ball, so the tops of the petals were free to move.
 
As I began the lower layers of the centre I used double sided paper as the undersides could be seen and curled the paper to give the petals more 'life'.  This photo is of the completed flower.
 
I used TSS metal in silver to cover the sides of the canvas.  I just doodled free-hand on the metal with a couple of the TSS tools.  I needed to colour the metal to make it tone in, but don't own any Alcohol Inks (OK I can hear the gasps of horror!!).  I used brown acrylic paint applied with my finger (very carefully, so no cuts!) and then rubbed it back with a piece of kitchen towel.  I stuck it on using TSS Humungo tape and made sure the edges and corners were safe.
 
I tore the vellum into a long shape and spritzed it with some kind of gold mist that I think I've chucked out now!!  I then placed that and the completed flower to get the composition right. 
 
The canvas needed something else.  A while ago I had bought some vintage glitter rub-ons from QVC.  One of them was of a girl holding a flower which looked suspiciously like a dahlia.  I painted a smaller canvas the same colour as the base and applied the rub-on to the canvas.  It didn't really stick too well at first, but I used my finger direct onto the image and it eventually stuck, but I distressed it as it looked too pristine.  I put metal round the miniature canvas too and put a self adhesive clear dome over the flower.
 
 
I stuck everything down once I was happy with compostion using silicone or Glossy Accents.  In hindsight I don't think I shoulda used Glossy Accents on the vellum as it showed through a little, but maybe it added to the crumpled / distressed look.  I used another dome to highlight the word 'dahlia'.


To finish off I stamped an Elusive Image stamp onto Stampbord which I had coloured yellow and higlighted the stamp using a scraping tool.
 
This sentiment is perfect for Keith's sense of humour!!


I put a few dots of liquid pearls round the corners and a couple of yellow jewels and the canvas was ready for delivery to Keith once it dried.  he was delighted with it.  You can make your own mind up....


And by the way...can you guess how many petals it took? No prize, just for fun!!

Friday, 30 July 2010

A tale of two mirrors, well OK 4!!!!

I've been to a few workshops since my last post and have suffered the same, if not more, exhaustion.  Two were back to back, the week before treatment so you can imagine how tired I've been!

Anyhoo, onto mirrors.  Every crafter worth their salt has discovered the humble Ikea mirror.  Sold for around a pound, they can be altered in any number of ways and are a great substrate to use for just about any technique.  They come in plain, black and red (at the moment) and I have had at least one in each colour.


I've been to two workshops that used mirrors as their basis and we learned loads of techniques around decorating the mirror.

The first one was a while ago and was a 'Ranger Techniques Mirror' and dealt with the crafting goodies produced by Ranger for Sir Tim of Holtz, Suze Weinberg and Claudine Hellmuth.

First we painted the mirror using Claudine Hellmuth paint.  I chose blue, while everyone else seemed to choose light colours.  Then Lynn showed us how to pour UTEE (Ultra Thick Embossing Enamel)  into molds, and onto stamps with a memory frame on top to create a framed piece of textured UTEE.  As I wobble, Lynn poured mine for me and as you can see the results are fantastic!  Once solidified, I dusted Perfect Pearls over the top to accent the texture.


Then we all chose an image from a pile of pages Lynn had printed out from various free image sites.  I chose a lovely lady and used Sticky Back Canvas to transfer the image using the technique Lynn had used during the Open Day (see previous post).  I left some of the 'lint' from the back of the paper on the image as I liked the way it looked!


Then Lynn showed us how to stamp on Sticky Back Canvas using Golden Gel Medium as a resist and painting over it with a wash to bring out the resisted image.  Unfortunately I just couldn't get my stamping to resist.  I did everything right and tried 3 times (even with Lynn watching me) and I still couldn't do it.  Absolutely no explanation.  I will try it again.  So Lynn had to give me one she had done.

I finished it off using fragments over stamped images, some alcohol inked and some sprockets and gears.

Next to the sprockets and gears is a UTEE flower made from a mold (made with mold 'n' pour) from an ornate button.


And finally the finished mirror.  Excuse the view of my spice rack in the mirror.  Its really difficult to get good light without things reflecting in the mirror!


The next mirror is done with wax.  This was in a workshop done last week called 'Waxing the Melt Pot Way'.

We started by choosing images from a pile Lynn had provided for us again as well as magazines.  Then we placed them onto the mirror to get the presentation right, then heated the wax up in our melt pots.  You have to heat the wood (or any solid substrate you're using) first so that the wax will adhere properly.  This must be done in between each wax layer too.  The paper has to be completely covered in wax by placing it in the melt pot and using tweezers to take it out and apply it to the mirror.  You have to burnish the paper between every paper layer to ensure good adhesion.

Once we done this and had all of our paper waxed to the mirror, we started to apply wax to the parts of the mirror with no paper on, with a natural bristled brush.  Then  we started to build up the wax on the corners on the mirror and add texture using stamps (they must be heated first) and and onion net, but anything can be used. 


We used Perfect Pearls and Bedazzles to highlight the texture on the mirror, and here is the finished article.  I haven't had the inclination to clean the mirror yet, so it still has dribbles of wax on it.  Also the pink feet you can see are from a Piglet beanie I have sitting on the top of my wardrobes!


And the fourth mirror I have to show you is one loosely based on one I saw in Craft Stamper magazine a while ago.  It uses Ten Seconds Studio (TSS) metal with alcohol inks to colour it.  I've made another 2 in plain silver as gifts since making this one.