Pages

Showing posts with label UTEE. Show all posts

Sunday, 29 May 2011

Carrie's Frame

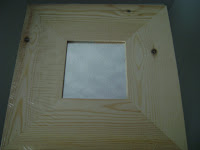
It was Carrie's birthday earlier in May - the big 4-0!!  I wanted to get or make her something special so in January I spotted this frame in a Charity shop window.  The guy in the shop knows me now and when I asked to look at it he automatically showed me the back first!

The first thing I did when I got home, after taking this photo of course, was the take it to pieces and rip the leaves and glittered apple out of it and bin the them.  I couldn't get the glass out as it had been glued to the front frame.  Thank goodness the inside with the recesses came off cleanly!


I didn't need to prepare the surface apart from cleaning as the inside had been painted with some sort of matte paint.  As far as I could see the frame had already been altered into the state I bought it in as the painiting was not factory done. 

I painted the inside of the frame and recess with Viva Precious Metal Paint in Blackberry and then dry brushed the same make of paint in Mother of Pearl over it.  both of thses paints are very high in mica content so shimmer beautifully.  I painted the outside of the frame with Precious Metal in Silver to tie both parts together as the mother of pearl paint has a slightly silver tone to it.  Of course I forgot to photograph them at this stage, but you'll be able to see what I mean on the finished frame.

Next I made some flowers using a tissue drinks coaster and some pages from a book.  I cut both of them with a Nestie circle die.  Especially for S and J at the hospital here are the photos :)

These are the cut circles which have been scrunched up and sort of flattened back out.
The same circles which I have sprayed with Glimmer Mists in Key Lime Pie and Lemon Zest.
And again once they have been dried with a heat tool and ready to shape into a flower around a bead.   Lynn R-H taught me the technique at a workshop.  You start with a bead and a little glue and mold the paper around the bead.  Keep doing this with tissue, paper and glue until you have a flower of the size you want.

  
 And this is a close up of the finished flower.  I made the beads for both of the flowers during a workshop that Carrie, Jo and I attended and had a great time!

I chose bobbins to into the recess as Carries loves sewing.  My Mam wrapped the thread round 2 of the bobbins and I painted the 3rd and put a vintage cigar bad round it with a picture of a german castle on it.  Carrie also loves Germany.

This flower was made in the same way but sprayed with Jazz Blue and Fully Purple Glimmer Mists.

My Mam helped again by filling the miniature bottles with lavender grown in my garden and tied ribbon round the tops to finish them off.  The ribbon is from the loops you get on clothes to keep them on the hanger.  I cut them off and use them for projects!

Carrie love the outdoors and I thought the Lavender would be perfect here.

Placing the bobbins and bottles was difficult as I was shaking while doing it.  Thank goodness the Glossy Accents has a little time before it dries lol!!!


For the middle, I made a torso from pearl UTEE (Ultra Thick Embossing Powder) using a mold Jo has. It has a front and back to the mold but I just used the front.

The 'pedestal' that the torso is to stand on is a piece of dense foam from the bottom of TH Embossing Folder packaging.  I've been keeping it but didn't know why til now ;)
I painted the pedestal the same colour as the recess and stuck the whole angel together using silicone.


Then it was just a case of cleaning the glass up, bearing in mind I couldn't get it our of the frame.  There was gold paint on it from the last time it had been painted and somehow I'd managed to get the Blackberry colour on the inside of glass right in the middle.  So once I got that off and gave it a good dust, I could put it all together.

Here is the finished frame and it is totally personal to Carrie!

Friday, 30 July 2010

A tale of two mirrors, well OK 4!!!!

I've been to a few workshops since my last post and have suffered the same, if not more, exhaustion.  Two were back to back, the week before treatment so you can imagine how tired I've been!

Anyhoo, onto mirrors.  Every crafter worth their salt has discovered the humble Ikea mirror.  Sold for around a pound, they can be altered in any number of ways and are a great substrate to use for just about any technique.  They come in plain, black and red (at the moment) and I have had at least one in each colour.


I've been to two workshops that used mirrors as their basis and we learned loads of techniques around decorating the mirror.

The first one was a while ago and was a 'Ranger Techniques Mirror' and dealt with the crafting goodies produced by Ranger for Sir Tim of Holtz, Suze Weinberg and Claudine Hellmuth.

First we painted the mirror using Claudine Hellmuth paint.  I chose blue, while everyone else seemed to choose light colours.  Then Lynn showed us how to pour UTEE (Ultra Thick Embossing Enamel)  into molds, and onto stamps with a memory frame on top to create a framed piece of textured UTEE.  As I wobble, Lynn poured mine for me and as you can see the results are fantastic!  Once solidified, I dusted Perfect Pearls over the top to accent the texture.


Then we all chose an image from a pile of pages Lynn had printed out from various free image sites.  I chose a lovely lady and used Sticky Back Canvas to transfer the image using the technique Lynn had used during the Open Day (see previous post).  I left some of the 'lint' from the back of the paper on the image as I liked the way it looked!


Then Lynn showed us how to stamp on Sticky Back Canvas using Golden Gel Medium as a resist and painting over it with a wash to bring out the resisted image.  Unfortunately I just couldn't get my stamping to resist.  I did everything right and tried 3 times (even with Lynn watching me) and I still couldn't do it.  Absolutely no explanation.  I will try it again.  So Lynn had to give me one she had done.

I finished it off using fragments over stamped images, some alcohol inked and some sprockets and gears.

Next to the sprockets and gears is a UTEE flower made from a mold (made with mold 'n' pour) from an ornate button.


And finally the finished mirror.  Excuse the view of my spice rack in the mirror.  Its really difficult to get good light without things reflecting in the mirror!


The next mirror is done with wax.  This was in a workshop done last week called 'Waxing the Melt Pot Way'.

We started by choosing images from a pile Lynn had provided for us again as well as magazines.  Then we placed them onto the mirror to get the presentation right, then heated the wax up in our melt pots.  You have to heat the wood (or any solid substrate you're using) first so that the wax will adhere properly.  This must be done in between each wax layer too.  The paper has to be completely covered in wax by placing it in the melt pot and using tweezers to take it out and apply it to the mirror.  You have to burnish the paper between every paper layer to ensure good adhesion.

Once we done this and had all of our paper waxed to the mirror, we started to apply wax to the parts of the mirror with no paper on, with a natural bristled brush.  Then  we started to build up the wax on the corners on the mirror and add texture using stamps (they must be heated first) and and onion net, but anything can be used. 


We used Perfect Pearls and Bedazzles to highlight the texture on the mirror, and here is the finished article.  I haven't had the inclination to clean the mirror yet, so it still has dribbles of wax on it.  Also the pink feet you can see are from a Piglet beanie I have sitting on the top of my wardrobes!


And the fourth mirror I have to show you is one loosely based on one I saw in Craft Stamper magazine a while ago.  It uses Ten Seconds Studio (TSS) metal with alcohol inks to colour it.  I've made another 2 in plain silver as gifts since making this one.

Friday, 25 June 2010

We'll always have Paris

Not too long ago I passed the YMCA charity shop in my local town and they had a frame in the window for £2.  It was one of those awful ones (apologies to anyone who has one and loves it) that people used to have in their bathrooms.  It had a wooden frame behind the glass that was used as shelves to have tiny bales of towels and toilet rolls on.  It was a bit like a miniature version of a bathroom.

When I asked to see it, the guy in the shop showed it to me like a fine bottle of wine.  You shoulda seen his face when I told him I wasn't bothered about the front, but turned it over to look at the back to see if I could take it to bits.  Once we got home, my Mam and I wasted no time in ripping into it.  My Mam had to get a screwdriver to the glue under the little ornaments to prise them loose.  Far to dangerous in my hands!!

I'm gutted I didn't take a photo of it in its pre-enhanced state!

I didn't bother sanding the frame or gessoing it as it had been painted with a matte paint.  I used a Stewart Gill Byzantia paint in a blue (the name has come off the lid so no help with the name) and painted 2 coats.  I then used a Stewart Gill Alchemy (same thing with the lid) over the top and accidentally rubbed a little of the paint off while trying the move the frame.  It must've been serendipity as the result was a little of the pinky-peach colour that the frame was originally showed through.  I quickly rubbed some more off before the paint dried!

I painted the wooden frame insert with silver Stewart Gill paint as I wanted it to show off what was in the compartments not fight against them.

I had a bought a miniature Eiffel Tower for 50p in the infamous ex-catalogue shop where I got the mannequins.  I decided the turn the wooden frame so the 'shelves' were vertical and placed the little tower in one of the compartments.  I then borrowed Jo's Paris Postcard stamp plate by Elusive Images part of Graphicus and stamped the cathedral onto acetate before putting variegated metal leaf behind it.  I bent it to fit into the other compartment.

For the background which is attached to the board at the back of the wooden insert frame, I used a piece of paper that came in a Graphicus Guild paper pack.  I creased the paper slightly before sanding it and using a Distress Ink in Vintage Photo.  I spritzed some water onto it too before attaching it to the board.

The glass at the front of the overall frame had to be thoroughly cleaned before I stamped a couple of swirls by Creative Expressions on in Timber Brown Stazon just to take the 'starkness' of the glass away.


Once I had assembled the frame I had to tape the back board to the wooden frame insert and use silicone glue to glue the insert to the larger frame.  It took an awful lot doing, strength not being my 'strong' point (LOL!!!) and then I had to leave this overnight to dry. 

I wanted something on the front of the frame, but not words, so I used a technique I learned from Lynn at Graphicus.  I took 3 Prima white flowers in complimentary sizes and sprayed them Tattered Angels Glimmer Mist in Tattered Leather.  I dried each of them thoroughly with a heat tool before patting them with a Versamark ink pad.  I sprinkled platinum UTEE over the flowers and used a heat tool to set the UTEE.  The result is a flower that looks like metal.

And this is the completed frame.  Sorry the photo's not great but glass tends to reflect!!


It looks really gorgeous with light shining on it (even if I do say so myself LOL!!!)

Sunday, 13 June 2010

Graphicus Open Days

I had a VERY tiring but VERY inspiring day yesterday at Graphicus in Barnard Castle.  Graphicus is a wonderful craft shop which is very simply Crafting Heaven.  As it was an Open Day there were lots of demonstrations going on and I sort hopped between them all. 

Firstly there was Glenda Waterworth who owns Graphicus showing off their new Mermaid stamp plates and she was doing some absolutely AMAZING colouring with the Copic Ciao markers. 
Here are some of the wonderful samples Glenda made yesterday.


This is Lynn Robinson-Hunter.  She usually does loads of Ranger techniques on tags using distress inks.  However yesterday she was amazing people with an image transfer technique using Claudine Hellmuth Sticky Back canvas.
Lynn places the sticky back canvas on to the front of the image.  Yes you read right.  It covers the image completely.  Then you burnish it and spritz the paper and rub it off the back of the canvas.  It is quite relaxing doing this or watching someone else doing it!

She was also doing a lot with beeswax.  This technique is wonderful!!!  If you'd like to know more about this technique there is a workshop running at Graphicus on Thursday 22nd July.  Details are available on the Graphicus websiteJust go to the tab on the left marked 'Book a workshop'.  These are pictures of the book boards that she made yesterday and Friday. Something along these lines will be made at the workshop. Please come along!


Lesley Wharton was also there doing demonstrations using Clarity Stamps and techniques as well as the new CD (which is gorgeous!!).  She was also using the new Mermaid stamps.

Judith Walton was demonstrating the Ranger Melt Pot using Ultra Thick Embossing Enamel (UTEE) to make jewellery.  She was using molds made with Mold 'n' Pour and filling them with UTEE and that is how the key was made in the picture.
It was a brilliant day, but I am paying for it now as I am exhausted.  I've been in bed all day and my legs are really hurting even though Graphicus kindly gave me a chair at each demo.  A big thanks to David for providing the food (and my extras for my tea!) and Carrie for giving me a lift there and back!